In this post, I would like to explain a basic but confusing concept of CUDA programming: Thread Hierarchies. It will not be an exhaustive reference. We will not cover all aspects, but it could be a nice first step.
If you are starting with CUDA and want to know how to setup your environment, using VS2017, I recommend you to read this post.
From CPU to GPU
To get started, let’s write something straightforward to run on the CPU.
#include "cuda_runtime.h"
#include "device_launch_parameters.h"

#include <cstdio>

void printHelloCPU()
{
	printf("Hello World from the CPU");
}

int main()
{
	printHelloCPU();
	getchar();
	return 0;
}
Now, let’s change this code to run on the GPU.
#include "cuda_runtime.h"
#include "device_launch_parameters.h"

#include <cstdio>

__global__ void printHelloGPU()
{
	printf("Hello World from the GPU\n");
}

int main()
{
	printHelloGPU<<<1, 1>>>();
	cudaDeviceSynchronize();

	getchar();
	return 0;
}
The cudaDeviceSyncronize function determines that all the processing on the GPU must be done before continuing.
Let’s remember some concepts we learned in a previous post:
- The
__global__keyword indicates that the following function will run on the GPU. - The code executed on the CPU is referred to as host code, and code executed on the GPU is referred to as device code.
- It is required that functions defined with the
__global__keyword return typevoid. - When calling a function to run on the GPU, we call this function a kernel (In the example, printHelloGPU is the kernel).
- When launching a kernel, we must provide an execution configuration, which is done by using the
<<< ... >>>syntax.
The Execution Configuration
At a high level, the execution configuration allows programmers to specify the thread hierarchy for a kernel launch, which defines the number of thread blocks, as well as
how many threads to execute in each block.
Notice, in the previous example, the kernel is launching with 1 block of threads (the first execution configuration argument) which contains 1 thread (the second configuration argument).
The execution configuration allows programmers to specify details about launching the kernel to run in parallel on multiple GPU threads. The syntax for this is:
<<< NUMBER_OF_BLOCKS, NUMBER_OF_THREADS_PER_BLOCK>>>
A kernel is executed once for every thread in every thread block configured when the kernel is launched.
Thus, under the assumption that a kernel called printHelloGPU has been defined, the following are true:
printHelloGPU<<<1, 1>>>()is configured to run in a single thread block which has a single thread and will, therefore, run only once.printHelloGPU<<<1, 5>>>()is configured to run in a single thread block which has 5 threads and will, therefore, run 5 times.printHelloGPU<<<5, 1>>>()is configured to run in 5 thread blocks which each have a single thread and will, therefore, run five times.printHelloGPU<<<5, 5>>>()is configured to run in 5 thread blocks which each have five threads and will, therefore, run 25 times.
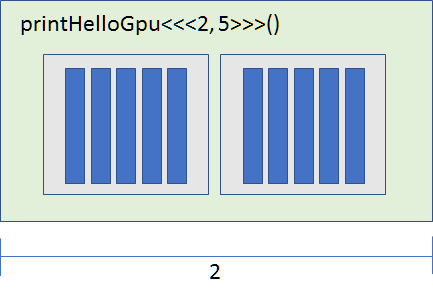
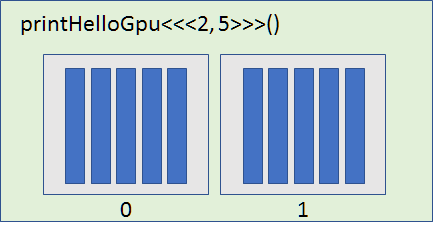
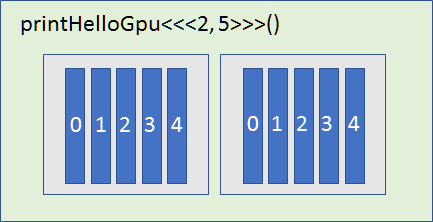
Let me try to explain this graphically:

In the drawing, each blue rectangle represents a thread. Each gray rectangle represents a block.The green rectangle represents the grid.
Thread Hierarchy Variables
In the kernel’s code, we can access variables provided by CUDA. These variables describe the thread, thread block, and grid.
gridDim.x is the number of the blocks in the grids.

blockIdx.x is the index of the current block within the grid.

blockDim.x is the number of threads in the block. All blocks in a grid contain the same number of threads.

threadIdx.x is index of the thread within a block (starting at 0).

X… Y, and Z
As you noted, we have been using the suffix .x for all variables. But, we could use, .y and .z as well.
The CUDA threads hierarchy can be 3-dimensional.
#include "cuda_runtime.h"
#include "device_launch_parameters.h"

#include <cstdio>


__global__ void printHelloGPU()
{
	printf("Hello x: #%d  y: #%d\n", threadIdx.x, threadIdx.y);
}

int main()
{
	dim3 threads(3, 3);
	printHelloGPU<<<1, threads>>>();
	cudaDeviceSynchronize();

	getchar();
	return 0;
}
We can use the dim3 structure to specify dimensions for blocks and threads. In the example, we specified we are creating a 2-dimensional structure (3x3x1).
Deciding what execution configuration to use
Consider:
printHelloGPU<<<1, 25>>>()is configured to run in a single thread block which has 25 threads and will, therefore, run 25 times.printHelloGPU<<<1, dim3(5, 5)>>>()is configured to run in a single thread block which has 25 threads and will, therefore, run 25 times.printHelloGPU<<<5, 5>>>()is configured to run in 5 thread blocks which each has 5 threads and will therefore run 25 times.
So, what configuration is right? Answer: All choices are valid. What should you use? It depends.
As you know, each thread will run the kernel once. If you are working on some data in memory, you should use the configuration that makes easier to address the data, using the thread hierarchy variables. Also, your graphics card has limitations that you need to consider.
Conclusions
If you are like me, you will need some time to understand Thread Hierarchies. In future posts, I will start to share some practical examples that can make it simpler.
For a while, feel free to comment this post.
Cover: Ilze Lucero


